
Welcome to the fourth chapter of our Modelica Series. In this tutorial, we'll take a closer look at functions in Modelica. You'll learn both how to call predefined functions and how to construct new ones.
If you've missed the previous chapters of this series, it might be a good idea to read them through before starting with this one. You can find the first chapter here.
Ready? Let's get started!
Calling predefined functions in Modelica
In the previous chapters, you learned to use and create models. The model class is essential for systems modeling in Modelica. But to produce flexible, structured, and efficient code, we also need functions. Functions help us calculate different properties in our models and are useful for a large number of applications.
The Modelica Standard Library comes with an extensive number of predefined functions for various applications. The Math and ComplexMath packages contain the most common math functions, like sin() and cos(), as well as functions operating on vectors and arrays. The Utilities package contains scripting functions acting on files, strings, and streams. And the Media package contains functions for calculating media properties such as temperature, pressure, and enthalpy.
Calling a predefined function from within a model is easy. All you have to do is to drag and drop the function from the Modelica Standard Library to the text layer of your model.
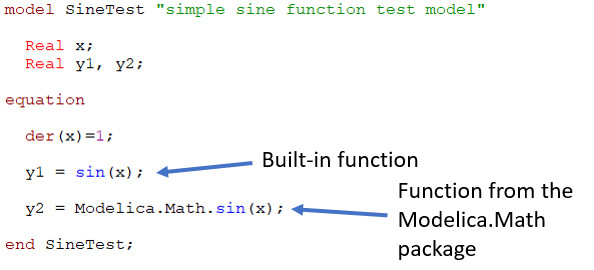
As you can see in the example above, some math functions, e.g., sin(), cos(), exp(), etc., are built-in and can be accessed directly from a model without any package prefix in the function name.
We've now learned how to find and call predefined functions from the Modelica Standard Library. In the following example, we'll implement a function of our own.
Get ready for some coding!
Warehouse Order Management
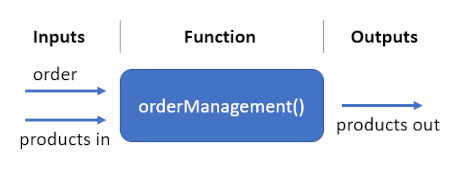
In this example, we'll implement a simple warehouse order management function. When an order arrives at our warehouse, we compare it with the available inventory. If the products are in stock, we ship the entire order. If the number of products in stock is smaller than the order, we ship all products available. The function we're about to write will help us model this process.
The first thing you need to do is to create a new function in your Modelica Editor in the same way you created models in the previous chapters of this series. I named my function orderManagement.
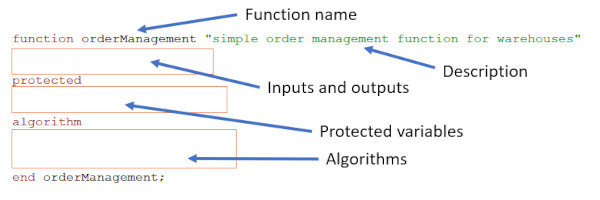
Go to the Text view of the function. Although the layout of the empty function looks similar to the model class that we've seen previously, there are some key differences between functions and models that we need to keep in mind. In the public variable section of a function, we're only allowed to declare input and output variables. Any non-input/non-output variable needs to be declared as a protected variable, accessible only from within the function. Another key difference is that the function uses procedural algorithms rather than equations. These are written in the algorithm section of the function.
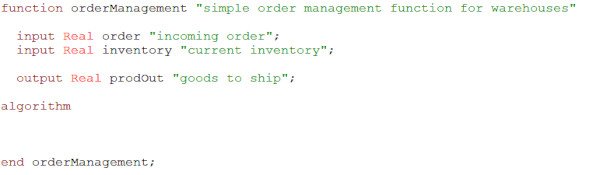
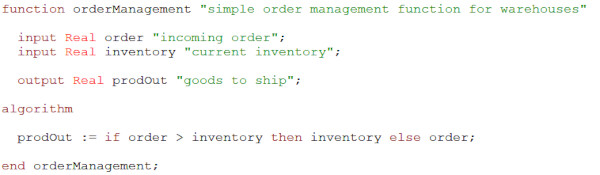
We're now ready to declare the inputs and the output of our function. The order quantity and the available inventory are the inputs. The output variable is the number of products shipped from the warehouse. When done, you should have something similar to this.
The next step is to calculate the number of products to ship. We can use an if-statement to make this calculation. The syntax of an if-statement in Modelica is shown below:
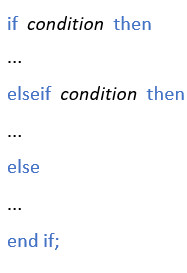
By adapting this syntax to our needs, we get:
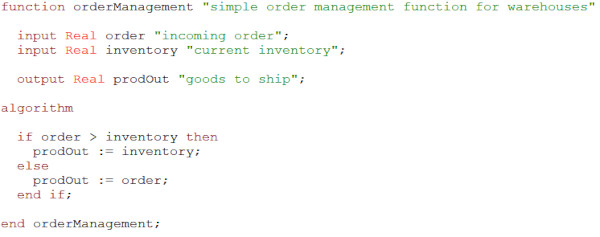
Note that we use ':=' instead of '=' in our assignments to emphasize that we're writing algorithms rather than equations.
Our function is now ready to use. Let's try it out!
Warehouse modeling
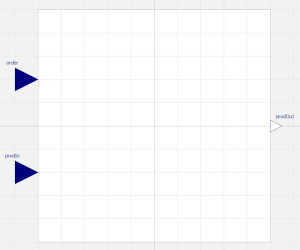
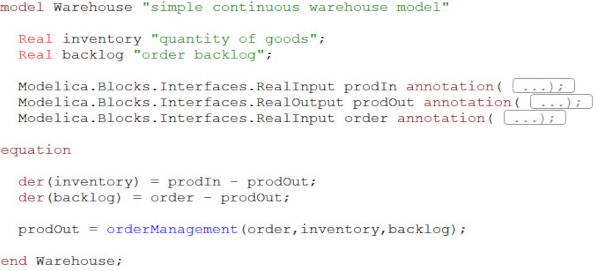
We'll now implement a simple warehouse model that uses the order management function implemented in the previous step. Create a new model in your Modelica tool and call it Warehouse. The first step is to add input and output connectors to the model. We need inputs for incoming goods and orders, and an output connector for the shipped items. Drag and drop these connectors (Modelica.Blocks.Interfaces.RealInput & Modelica.Blocks.Interfaces.RealOutput) to the Diagram view of your model.
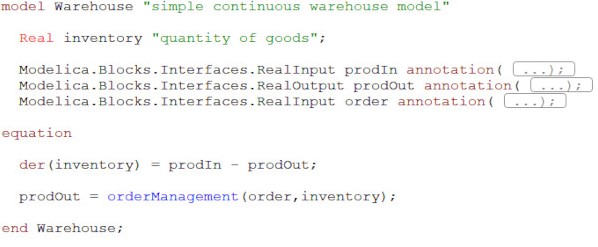
Next, we need to calculate the inventory. Here we can assume that its time derivative is equal to the difference between incoming and outgoing goods. We also need to calculate the number of outgoing products. Luckily, we've implemented a function that can help us do that! All we have to do is to call it from within our Warehouse model. When done, you should have the following code:
The final step is to add an icon to your model. The Warehouse is now ready to use in a system model. Create a new model and call it WarehouseTest. Go to its Diagram view and drag and drop the Warehouse model, a Modelica.Blocks.Sources.Sine and a Modelica.Blocks.Sources.Constant into the diagram.
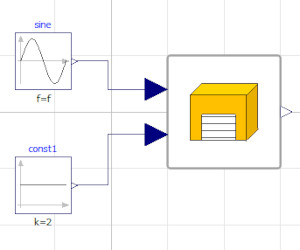
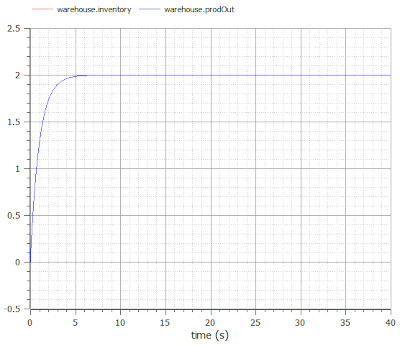
Let the sine act as input to the order connector of the warehouse. Connect the constant block to the incoming products connector. Change the sine wave offset and amplitude and the constant value to 2. Simulate 40 seconds and plot the inventory, the ordered quantity, and the outgoing products.
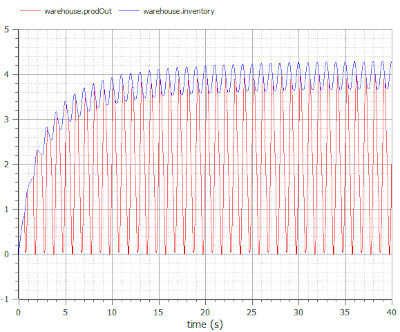
We can see that the inventory is too small at the beginning of the simulation. Our order management function then fails to ship the entire order. Instead, it sends the quantity available in stock. Since this is the way we have designed our function, everything seems to work fine. However, there is always room for improvement. Let's head back to our function again to see if it is possible to make some simplifications.
Improving the function
The first thing we can do is to simplify the if-statement a bit by replacing it with an if-expression:
In fact, in this case, we can simplify the expression even more by using the min(x, y) operator:

The min(x, y) operator compares the two scalars and returns the minimum value. Try it out!
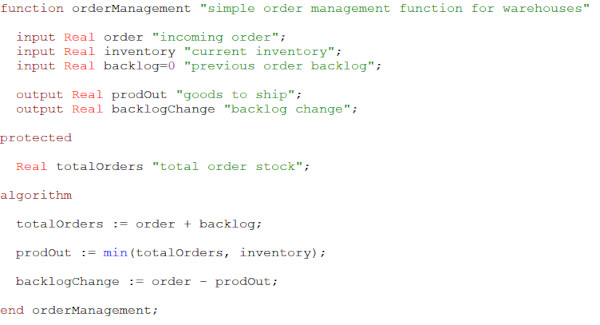
One issue with our function is that it doesn't take the order backlog into account. Any order not fulfilled is sent straight to the trash. We can solve this by adding another input, called backlog, to our function. We give if a default value of 0. By doing so, we let the user decide whether or not to provide the input when calling the function. We also add an intermediate variable, totalOrders. It's not allowed to add public non-input/non-output variables to a function. So, we make the variable local instead by declaring it as a protected variable. You should now have something similar to this:

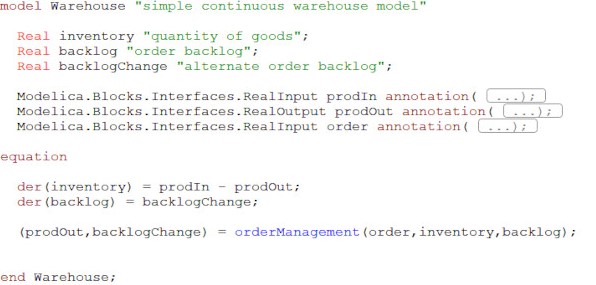
To test the updated function, we need to include the backlog in our Warehouse. We can calculate it from the difference between orders and deliveries. Go to the Text view of the Warehouse and update it according to:
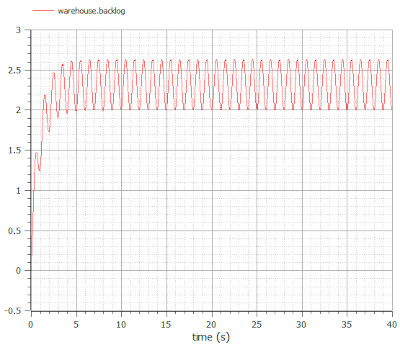
When done, go to the WarehouseTest model and simulate 40 seconds. Plot the orders, the inventory, the backlog, and the outgoing products.

The products in stock and the deliveries now reach a steady-state. But to reduce the order backlog further, we would need to increase the flow of products coming to the warehouse. Feel free to play around with the parameters to see how they affect the performance. For instance, what happens if we change the inflow of products to 3 in the constant block? Even in a simple warehouse example like this one, with lots of flaws and limitations, it's obvious how system simulation and the Modelica language can support the design and optimization of robust product flows in supply networks.
Functions with multiple outputs
Now, let's make some final adjustments to the orderManagement function. Functions in Modelica can have multiple outputs. We can use this feature to calculate the difference between ordered and delivered goods already in our function. Add a new output variable, backlogChange, to the function and add the appropriate algorithm.
Update the Warehouse model to use both outputs from the function. Note that the second output is optional. Even though we've included it in the function, we still have the option to use the Warehouse model as it was in the previous examples.
Go to the WarehouseTest model and simulate 40 seconds. It seems we've managed to add the second output to the model, without interfering with the results. Success!
We've now learned how to call and create functions in Modelica. In the coming chapters of our Modelica series, we'll talk more about Modelica, how it works, interfaces, and applications. Check out the next chapter now!
🚀 Ready to Go Further with Modelica?
Take your modeling skills to the next level with our Modelica Introduction Course. In just two days, you'll gain hands-on experience in system modeling and simulation, perfect for engineers, innovators, and anyone ready to build smarter systems.
👉 Explore the Modelica Introduction Course »